
Links to Amazon and eBay on this page can be affiliate links. If you buy through them I may earn a small commission, at no extra cost to you. See my affiliate disclosure.
This is the kind of guide I wanted when I started: not a list of boxes, but a complete home server setup that starts from what you want to run. The goal is simple. Stop paying for cloud photo storage and streaming, and run Immich for your photos and Jellyfin for your movies and series on your own hardware, for a budget of around €300 for everything.
I self-host my own services, and the hardware below is what I would buy for this build based on the specs and the official documentation of both apps. Where something depends on the exact model you find, I say so.
What this home server setup needs to do
- Immich: back up the photos from your phone, recognise faces and let you search your library
- Jellyfin: stream your movies and series to your TV, phone and browser, and convert video when a device can’t play the file
- Run all day in a small, quiet box on a shelf
- Keep your photos safe, with a backup outside the server
The Immich documentation asks for at least 6 GB of RAM and 2 CPU cores, and recommends 8 GB and 4 cores. Jellyfin needs little RAM, but it needs a graphics chip that can convert video, and the Jellyfin docs list Intel Quick Sync as a supported method. So the target for this home server setup is: 4 or more cores, 16 GB of RAM, an Intel CPU with Quick Sync and two drives.
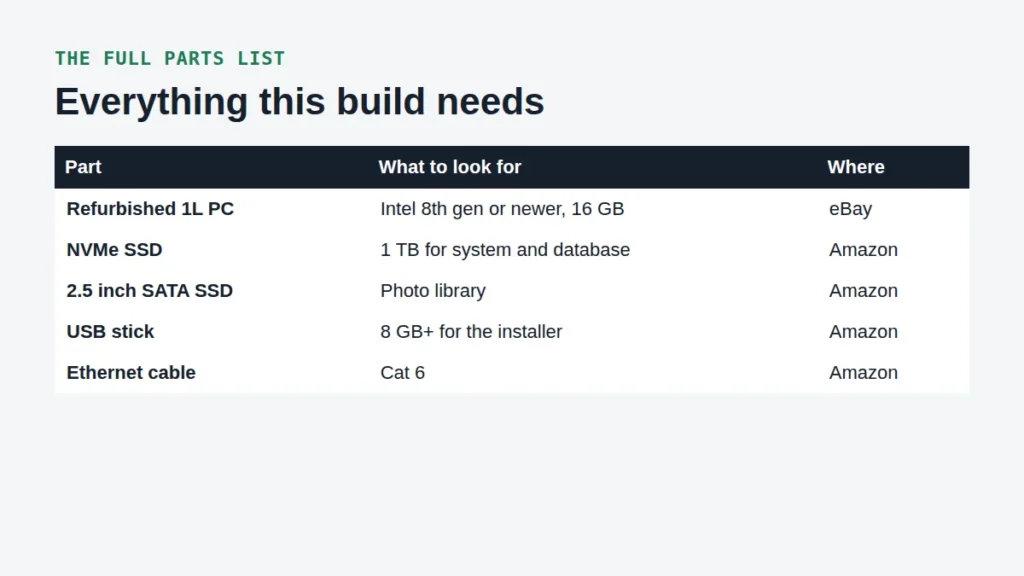
The complete parts list
| Part | What to look for | Why it is there | Where |
|---|---|---|---|
| Refurbished 1L PC (ThinkCentre M720q/M920q, OptiPlex Micro, EliteDesk Mini) | Intel 8th gen i5 or newer, 16 GB RAM | Enough cores for Immich, Quick Sync for Jellyfin | eBay |
| NVMe SSD | 1 TB | System, Immich database and thumbnails | Amazon |
| 2.5 inch SATA SSD | 1 or 2 TB | Photo library and media | Amazon |
| External USB drive | At least the size of your photos | Backup copy | Amazon |
| USB stick | 8 GB or more | Installer | Amazon |
| Ethernet cable | Cat 6 | Wired connection to your router | Amazon |
There are no prices here on purpose. They change every week, so check the current price yourself. Most of the budget for this home server setup goes to the PC and the two SSDs. If the PC you find already has a 1 TB NVMe inside, skip that part. If it only has 8 GB of RAM, add a second 8 GB stick, because these models have two slots.
Big movie collection? A 2.5 inch SSD won’t be enough. In that case plan a NAS build later and point Jellyfin at it. Not sure about the PC? My guide to the best mini PC for homelab builds explains the alternatives.
Why Debian and Docker for this home server setup, and not Proxmox?
I like Proxmox a lot for a practice lab, see my Proxmox vs ESXi guide. But for this home server setup I install Debian 13 directly on the hardware and run both apps in Docker. There are two reasons.
First, Jellyfin needs the Intel graphics for Quick Sync. On bare metal, Docker can use the graphics chip directly, without passing it through to a virtual machine. Second, the Immich docs don’t recommend running Docker inside an LXC container, so on Proxmox you would need a full VM anyway. For one box that runs two apps, plain Debian is simpler and easier to fix.
Home server setup, step by step
- Write the Debian 13 installer to the USB stick with balenaEtcher or Rufus, boot the PC from it and install Debian without a desktop. Tick SSH server during the install, so you can finish the home server setup from your laptop.
- Give the server a fixed IP address, either with a DHCP reservation in your router or on the server itself.
- Install Docker Engine with the Compose plugin by following the official Docker guide for Debian.
- Mount the SATA SSD, for example at
/srv/media, and create folders for your photos and movies. - Install Immich with Docker Compose. Download the
docker-compose.ymlandexample.envfrom the Immich releases page, setUPLOAD_LOCATIONto your photo folder, keepDB_DATA_LOCATIONon the NVMe SSD, and rundocker compose up -d. - Start Jellyfin with the compose file below, then turn on hardware acceleration in the Jellyfin dashboard and pick Intel QuickSync (QSV).
- Install the Immich app on your phone, log in to your server and turn on backup.
This is a minimal Docker Compose file for Jellyfin. The devices line gives the container access to the Intel graphics:
services:
  jellyfin:
    image: jellyfin/jellyfin
    container_name: jellyfin
    volumes:
      - ./config:/config
      - ./cache:/cache
      - /srv/media/movies:/media:ro
    devices:
      - /dev/dri:/dev/dri
    ports:
      - 8096:8096
    restart: unless-stopped
Where your data lives
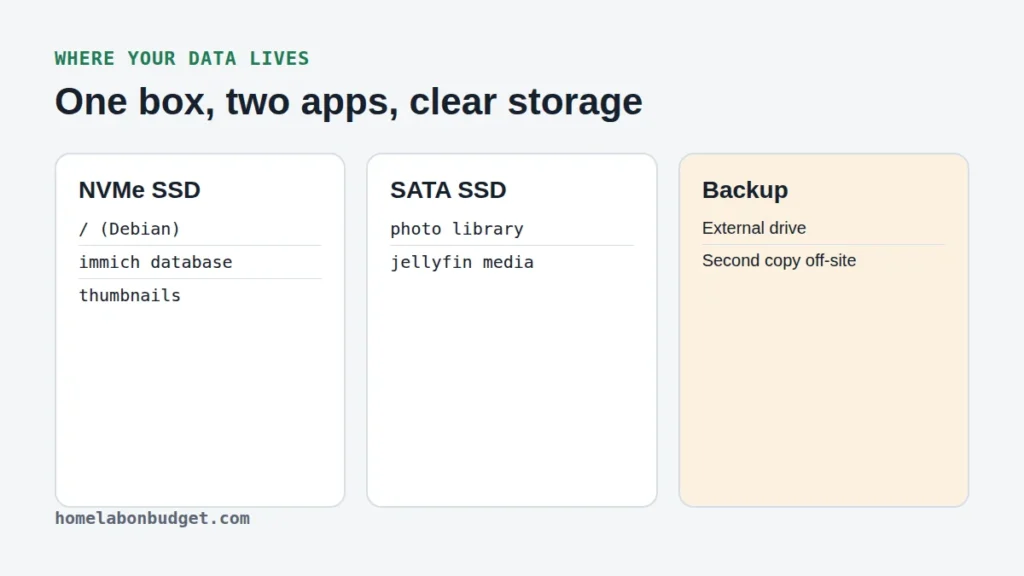
Keeping the Immich database on the NVMe SSD follows the Immich docs, which say the database should be on a local SSD and never on a network share. In this home server setup your photo and media library goes on the SATA SSD, so a reinstall of the system never touches it.
Remote access without opening ports
Once your home server setup works at home, you will want your photos on the go too. Don’t forward ports from your router to Immich or Jellyfin. The easiest safe option is Tailscale, a VPN that connects your phone and your server without opening anything to the internet. It has a free plan for personal use. WireGuard is the do-it-yourself alternative if you want to run the VPN yourself.
Backups: the part you can’t skip
Your photos are the one thing you can’t download again. A home server setup without backups is just a faster way to lose them. Immich can make automatic database backups, so copy your photo library and those database backups to the external USB drive on a schedule.
Keep a second copy outside your house too, for example a drive at your parents’ place or encrypted cloud storage. That is the 3-2-1 rule: three copies, on two kinds of storage, one of them somewhere else.
Is this home server setup worth it?
If you pay for cloud photo storage and a streaming service every month, this home server setup does both jobs on hardware you own. You also learn Linux and Docker along the way, which is useful for school or work. The trade-off is that you are now the one who does the updates and the backups.
Want to go further later? Add a NAS for more storage, or read the Raspberry Pi vs mini PC comparison if you want a second small device for Pi-hole. All complete builds are in the Build Guides category, and app guides are under Self-Hosting.
Frequently asked questions
How much RAM do I need for Immich and Jellyfin?
16 GB is comfortable for both. Immich asks for 6 GB at minimum and recommends 8 GB, and Jellyfin needs much less when Quick Sync does the video work.
Can I do this home server setup on a Raspberry Pi?
Immich works on a Pi 5 with 8 GB, but Jellyfin’s own docs advise against the Pi 5 because it has no hardware video encoder. A refurbished Intel mini PC is the better choice for both apps.
Do I need a NAS for this build?
Not at the start. The SATA SSD holds a normal photo library. You only need a NAS when your media no longer fits, and then Jellyfin can read from it over the network.